The Washing Machine Wall Box is an essential component for proper installation of a washing machine. It provides a convenient and safe connection point for water supply and drainage, ensuring efficient and hassle-free washing machine operation.
By securely mounting the box onto the wall, the machine’s hoses can be easily connected and accessed, eliminating the need for unsightly, exposed pipes. The box also includes shut-off valves for easy maintenance and repairs. With its compact design and durable construction, the Washing Machine Wall Box is a reliable solution for any laundry room.
Choosing The Right Wall Box
In the quest to optimize laundry areas, having the right Washing Machine Wall Box is essential. Key Features to Consider include compatibility with different models and sizes. This guide will assist in making an informed decision for your laundry setup.
Key Features To Consider
- Material: Durable plastic or metal for longevity.
- Adjustability: Ability to accommodate various pipe sizes.
- Waterproofing: Ensures protection against leaks.
- Installation: Easy to install and maintain.
Compatibility With Washing Machine Models
Ensure the wall box is compatible with your washing machine model. Check for dimensions and required connections to prevent any installation issues.
Preparing The Installation Site
Before installing your washing machine wall box, it’s important to properly prepare the installation site. This ensures that the plumbing connections are in good condition and that there is adequate ventilation for the appliance. Follow these steps to prepare the area:
Checking Plumbing Connections:
Take the time to inspect the plumbing connections in the area where you plan to install the washing machine wall box. Look for any signs of leaks, such as water stains or dampness. Ensure that the water supply valve and drain pipe are in good working order. If any issues are detected, it’s crucial to fix them before proceeding with the installation.
Ensuring Proper Ventilation:
Ventilation is important for the efficient operation of your washing machine. Ensure that there is suitable airflow in the installation site to prevent any moisture buildup and potential damage to the appliance. Check if the area has proper ventilation through windows or vents. In case the space lacks adequate ventilation, consider installing a fan or ventilation system to ensure optimal performance and prevent any potential issues.
By carefully preparing the installation site for your washing machine wall box, you can ensure a smooth installation process and maximize the performance of your appliance. Taking the time to check and address plumbing connections and ensuring proper ventilation will contribute to a hassle-free laundry experience.
Required Tools And Materials
In order to install a Washing Machine Wall Box, there are specific tools and materials you will need to have on hand. Ensuring you have the necessary items ready will make the installation process smoother and more efficient.
Essential Tools
Here are the essential tools required for installing a Washing Machine Wall Box:
- Level
- Measuring tape
- Adjustable wrench
- Drill with appropriate drill bits
- Screwdriver
- Utility knife
- Caulking gun
Materials For Securing The Wall Box
In addition to the essential tools, you will need the following materials to securely install the Wall Box:
- Washing Machine Wall Box kit
- Drywall screws or anchors
- Plumber’s putty or thread seal tape
- Plumbing adhesive
- Caulk

Credit: www.youtube.com
Step-by-step Installation Guide
The installation of a washing machine wall box may seem daunting, but with a comprehensive step-by-step guide, you can handle it with ease. In this post, we’ll walk you through the process of mounting the wall box, connecting the water and drainage lines, and ensuring your washing machine is set up correctly for optimal functionality.
Mounting The Wall Box
Before mounting the wall box, ensure that the area is clear and accessible. Use a stud finder to locate the studs in the wall. Once located, mark the positions where the screws will be inserted. It’s important to ensure the wall box is level before attaching it to the wall. Once the wall box is secure, proceed to connect the water and drainage lines.
Connecting Water And Drainage Lines
Start by connecting the water supply lines to the corresponding inlet valves on the wall box. Use a wrench to tighten the connections and ensure there are no leaks. Next, connect the drainage hose to the designated outlet on the wall box. It’s crucial to ensure that the drainage hose is properly secured to prevent any leaks or disconnections during the wash cycle.
Ensuring Proper Sealing And Leak Prevention
When it comes to installing a washing machine, one crucial aspect that homeowners often overlook is ensuring proper sealing and leak prevention. The last thing anyone wants is water damage caused by a faulty connection or leakage. To avoid such costly mishaps, follow these important guidelines to ensure your washing machine wall box is properly sealed and leak-free.
Using Waterproof Sealants
Properly sealing the connections of your washing machine wall box is essential for leak prevention. One effective way to achieve this is by using waterproof sealants. These sealants create a watertight barrier, ensuring that no water can escape from the connections. Apply the sealant directly onto the threads of the inlet hoses and securely attach them to the wall box. Be sure to tighten the connections properly and wipe away any excess sealant. This simple step goes a long way in preventing leaks and potential water damage to your laundry room.
Testing For Leaks
Even with the use of waterproof sealants, it is still crucial to thoroughly test for leaks before using your washing machine. Leakage can occur in hidden areas that may not be immediately visible, and catching it early can prevent extensive damage. To test for leaks, turn on both the hot and cold water faucets and let the water flow for a few minutes. Inspect the connections closely, checking for any signs of moisture or dripping. Additionally, check for any leaks around the drain hose connection. If you notice any leaks, immediately tighten the connections or reapply sealant as needed.
Moreover, it’s worth mentioning that regular maintenance and inspections are necessary to ensure continued leak prevention. Over time, wear and tear can occur, compromising the seal and increasing the risk of leaks. Routinely check the connections and look for any signs of deterioration such as cracks or loose fittings. Taking proactive measures and addressing any issues promptly will keep your washing machine wall box functioning properly for years to come.
Remember, proper sealing and leak prevention are crucial when it comes to your washing machine wall box. By following these guidelines and using waterproof sealants, you can protect your home from potential water damage and enjoy the convenience of a hassle-free laundry routine.
Safety Precautions
Proper safety precautions must be observed when working with a washing machine wall box to ensure a safe and successful installation.
Turning Off Water Supply
Before beginning any work on the washing machine wall box, turn off the water supply leading to the machine to prevent any leaks or accidents.
Handling Electrical Connections Safely
When dealing with electrical connections, always remember to switch off the power supply and use insulated tools to avoid electric shock hazards during installation.
Troubleshooting Common Installation Issues
Installing a Washing Machine Wall Box can sometimes pose challenges. Below are common installation issues and how to troubleshoot them effectively.
Dealing With Misaligned Connections
- Ensure all pipes and connections are properly aligned before securing them.
- Use a level tool to check the alignment of the wall box for precision.
- If misalignment persists, adjust the position of the box carefully.
Addressing Leakage Problems
- Check for any loose connections or fittings that may be causing leaks.
- Tighten any loose screws or bolts to secure the connections properly.
- If leakage continues, consult a professional plumber for assistance.

Credit: www.facebook.com
Maintenance Tips For Longevity
To ensure the longevity of your washing machine wall box, follow these maintenance tips for optimal performance. Regularly clean the box and inspect for leaks. Avoid overloading the machine and always use the recommended detergent amounts. Replace worn-out hoses and connectors to prevent water damage.
Maintenance Tips for Longevity When it comes to ensuring the longevity of your washing machine wall box, regular maintenance is key. By implementing these maintenance tips, you can prolong the lifespan of your wall box and avoid potential issues that may arise. Two paramount aspects to focus on for maintaining the wall box are regular inspection of connections and cleaning and sanitizing the wall box. Regular Inspection of Connections To ensure the proper functioning of your washing machine wall box, it’s crucial to conduct regular inspections of the connections. This involves checking for any signs of leakage, corrosion, or loose fittings in the wall box connections. By inspecting the connections on a routine basis, you can identify any potential issues early on and take preventive measures to avoid more significant problems. Cleaning and Sanitizing the Wall Box Regularly cleaning and sanitizing the wall box is essential for maintaining its optimal functionality. Over time, debris, soap scum, and other build-up can accumulate within the wall box, potentially causing blockages or inefficiencies. Utilize a mild detergent and warm water to clean the wall box thoroughly. Additionally, consider using a sanitizing solution to eliminate any lingering bacteria or mold. By incorporating this cleaning regimen into your maintenance routine, you can ensure the longevity and proper operation of your washing machine wall box. In addition to these key maintenance tips, it’s important to adhere to the manufacturer’s guidelines and recommendations for the specific model of your washing machine wall box. Regular upkeep and attention to detail will ultimately contribute to the prolonged durability and efficiency of your washing machine wall box.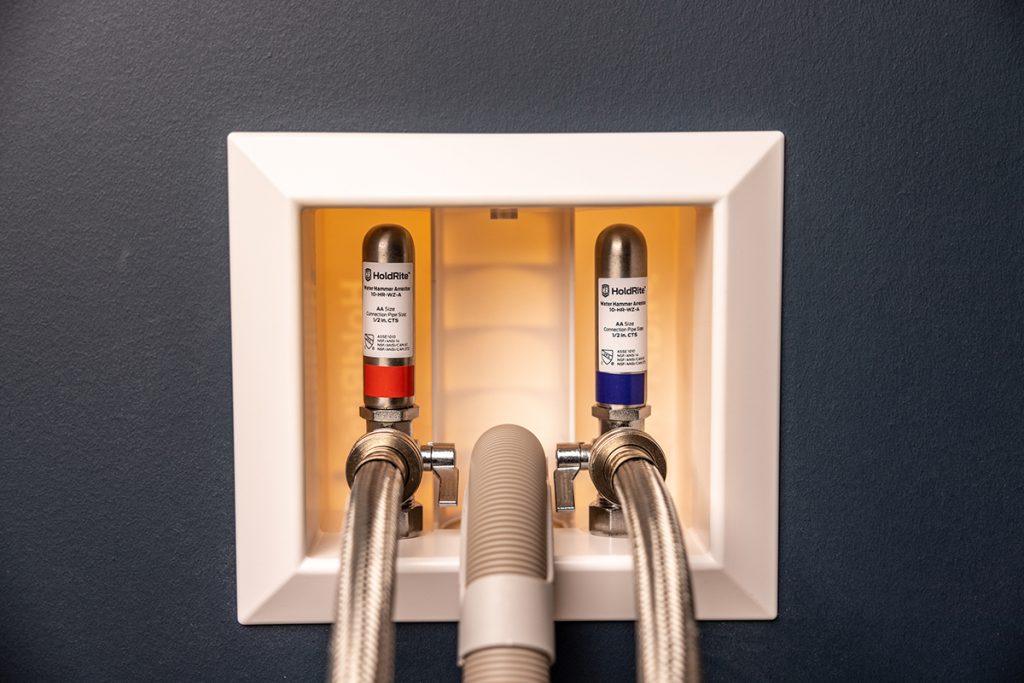
Credit: www.qualifiedremodeler.com
Frequently Asked Questions Of Washing Machine Wall Box
What Is The Purpose Of A Washing Machine Outlet Box?
A washing machine outlet box serves as a connection point for water supply and drainage. It allows for easy installation and maintenance of the washing machine’s plumbing system.
How High Should A Washing Machine Outlet Box Be?
The washing machine outlet box should be about 42 inches high to align with standard plumbing codes.
Does A Washing Machine Outlet Box Need To Be Vented?
A washing machine outlet box does not need to be vented.
How Much Does It Cost To Replace A Washer Hookup Box?
The cost to replace a washer hookup box ranges from $150 to $300. Factors like brand, materials, and labor influence the overall expense. Always consult a professional for accurate pricing.
Conclusion
To wrap it up, a washing machine wall box is an essential and practical addition to any laundry room. With its convenient installation and smart design, it provides a secure and organized space for your washing machine connections. By using a wall box, you can easily access and maintain your washing machine’s plumbing, saving you time and effort.
Say goodbye to cluttered laundry spaces and welcome the efficiency and functionality of a washing machine wall box. Upgrade your laundry routine today!